Installing Acoustic Panels

One project that I’ve been wanting to do for a while was to add acoustic panels to my home studio and office. Acoustic panels absorb sound, so they can greatly help to reduce room echo. Some rooms in my house are very echoey, which can be noticeable when doing recordings or live calls in an untreated room.
Previously my studio was ringed with several sound blankets (80 inches square) hanging on light stands. That was acoustically effective but rather ugly, and I didn’t like that the blankets blocked the windows too. I used the sound blankets for a few years to good effect though.
There are many YouTube videos sharing how to make your own acoustic panels on the cheap. I might have gone that route if I only needed a few panels, but I wanted more than 20 panels, and I thought I’d find the DYI approach really tedious after a while if I had to manually make that many panels. I also felt that it would add too many extra decisions to the process and slow me down a lot. I’d have to decide which wood to buy, which fabric to use, which acoustic material to put inside, and where to source these items. I also don’t own an electric saw or a stapler that can secure fabric to work, so I’d have to invest in additional tools as well. That all seemed like I’d be biting off more than I wanted to chew. This was a case where I’d rather spend more money to save time.
So I concluded that it would be way easier and less risky to buy professionally made panels. I still wanted a little bit of the DIY experience though, so I opted to install them myself, which was still a considerable amount of work.
Good acoustic panels are about 3x as effective at absorbing sound reflections as sound blankets, so you don’t need to cover as much wall area with the panels. It’s generally undesirable to have too much coverage. You want to retain some reflections, so the room doesn’t sound completely dead. A common recommendation I’ve seen is to cover at least 25-30% of wall area with panels.
My rooms also have carpeting too, so I don’t need to worry as much about vertical reflections. Hence I didn’t intend to install any panels on the ceilings.
The considerations for acoustic panels are different if you’re recording music or if you’re using them for controlling the reflections of speakers, such as in a home theater setup. I’m only concerned about vocals for audio/video recordings and for live video calls, so I prioritized my panel and installation choices based on that.
I also wanted panels that would look nice aesthetically. I wanted to appreciate the look of the panels when I’m in the rooms where they’re installed. That’s one reason I didn’t go with the cheaper foam panels. Foam panels are much less effective acoustically too, especially if you get the thinner ones (like 1 inch thick).
Sourcing the Panels
After researching various options, I decided to order all of the panels from Acoustimac. (I’m not an affiliate, and I have no sponsorship relationship with them.) I went with them after seeing some positive reviews and recommendations online. I feel that was a good choice, but since this is my first time using acoustic panels of any kind, I don’t really have anything to compare them to other than the sound blankets I was previously using.
I started by requesting fabric swatches, which they graciously sent for free. Their website provides an option to order the swatches for 1 penny plus about $8 shipping, but I didn’t notice that option till I’d already sent the request via the contact form. The swatches were very helpful in deciding which fabrics to go with. They have a lot of different color options, and the colors can look slightly different than the pics on their website.
I found that a good way to get a better price per panel was to take advantage of Acoustimac’s multi-panel packs instead of ordering them individually. They also let you customize the colors per panel. Even when I ordered an 8-pack where the order form invited me to specify two colors (4 of one color, 4 of another), I found out by contacting their support that I could get up to 8 different colors for the same price if I wanted. So that level of customization was really nice. In fact, overall I found their customer support to be excellent throughout the process. They even held up on shipping the panels when I asked them to (after I’d placed the order) because I realized they might arrive while I was out of town. I really appreciated that.
I ended up buying 8 of their 412 panels (4′ tall x 1′ wide x 2″ thick) and 16 of their 422 panels (4′ tall x 2′ wide x 2″ thick). You can mount the panels vertically or horizontally. I planned to mount most of them vertically. If you’re recording music, you might want to go with their thicker 4-inch panels, which are more effective at absorbing low bass sounds.
I also went with Acoustimac’s “eco” filling for the panels, which costs a bit more per panel. If you buy the panels individually, that option is $10 more per panel, but it can be as little as $3 per panel when you buy them in multi-packs.
Recording Studio
Here are some pics of the new acoustic panels I added to the studio. From left to right, the colors along this wall are rust, tan, spa, charcoal, gray. These are all 422 panels.
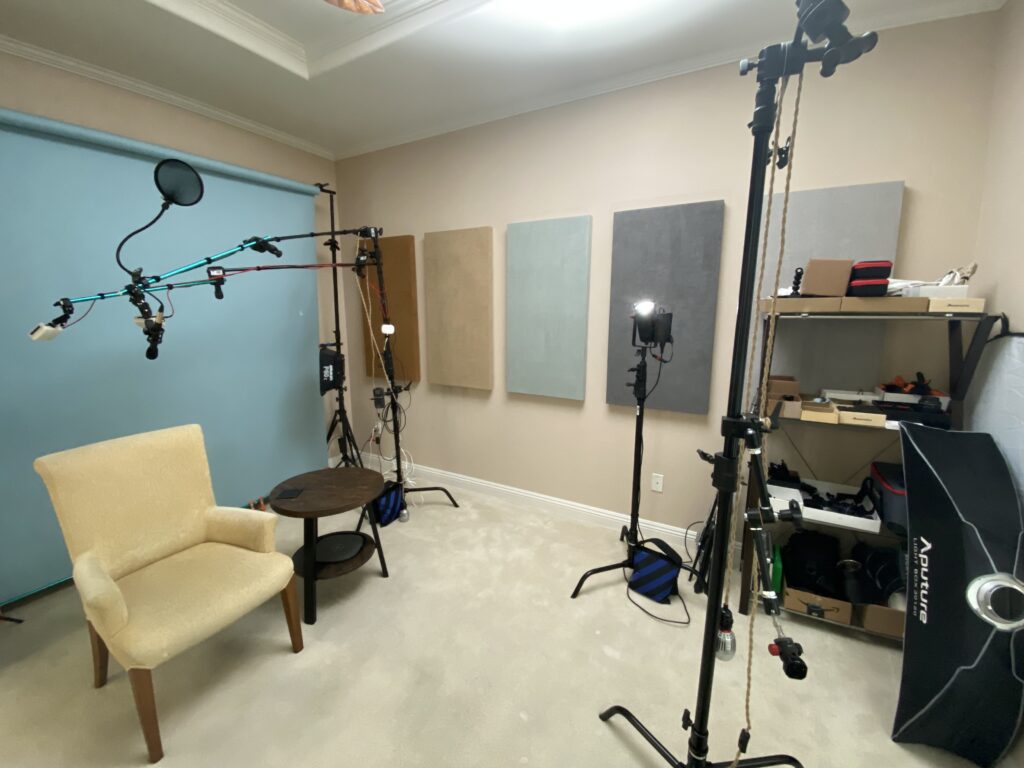
I put 3 of the 412 panels between the windows (charcoal, rust, black), and there’s another 422 panel (peat) behind the light with the light box on it.

Another modest upgrade would be to add some extra storage to the studio. I have a small glass bookshelf and a little filing cabinet in the room, but I could use some small shelves or a cabinet or two for storing various gear. This room doesn’t have a closet. It’s a relatively small space for a studio (about 14′ square), but it works.
Office
Here’s the home office. I put a couple of 422 panels in the corner (shell, tan). And I add 5 of the 412 panels behind the area where I do lots of Zoom calls (navy, spa, apple, tangerine, ruby). There are 5 more 422 panels on other walls of the room too, which aren’t shown (spa, shell, khaki, tan, gray).

How the panels look on camera is really sensitive to the lighting. The navy blue panel looks nearly black on camera if it isn’t getting much light, so I’ll use a 4′ tube light to splash some extra light on it when I’m live. The ruby red panel looks much brighter on camera. I’m using Amaran 100X’s with Light Dome Mini II soft boxes for my key and fill lights, which work nicely. I normally set the key to 15% and the fill at 7%, both at 5600K. I previously calibrated the lighting for a plain background where I mainly just had to focus on how to light myself, so I may need to re-calibrate the light settings for this different look.
I like how this looks on camera so far. It adds a bit of color, but I don’t think it’s overly distracting. We put the darker colors on the outside of the frame with the milder colors in the middle. With the framing on a Zoom call, you’ll only see about half of the navy and ruby panels, so the middle 3 panels are the most prevalent.
I also like that we can change the look a bit by splashing some colored light on the panels. I probably won’t do that for Zoom calls, but for recorded videos it can create some interesting looks.
Living Room
We added 3 panels to the living room too since I do some occasional filming there. Partly this was because we got a good deal buying the panels in 8-packs (24 total). We used 12 panels for the office and 9 for the studio, so we had 3 extra 422 panels to use for this room (spa, sunshine, apple).

Installation
It took me several hours to install the panels over the course of about 3 days since I carefully measured and calculated the exact positions for each one, having to balance aspects like acoustic effectiveness and symmetry.
The 412 panels weigh about 8 lbs each, and the 422 panels are about 15 pounds. The installation kit includes screws and metal brackets to hang the panels on the walls. I wondered if I’d need to use drywall anchors, but that turned out to be unnecessary. With 4 screws securing the brackets to the walls for each panel, they seem pretty secure in the drywall. If you have very weak or flaky drywall though, I might recommend using anchors, just to be safe.
One issue I had was getting the thinner 412 panels to hang straight. When hung vertically, the brackets are pretty close together, so even with careful measuring, I found it pretty difficult to install the brackets precisely enough to get the panel to be perfectly vertical when hanging. It would have been easier to get them to hang straight with a different mounting system, such as using picture hanging wire. Some of my 412 panels were a bit crooked when mounted, offset by 0.5″ or more horizontally from top to bottom. I found that if the difference was less than 0.25″, the panel will look sufficiently straight, but at 0.5″ or more, the crookedness becomes very noticeable.
My solution was to add a Command Strip to the bottom of each panel, so I could basically swing the bottom into perfect alignment and then “Velcro” it to the wall in the right position. Command Strips are pretty strong, and technically I might have been able to use them to secure the panels to the walls completely with no other mounting hardware. But these panels are right around the weight limits for Command Strips, and I’ve never used Command Strips before. I wasn’t sure how much I could trust them to hold the full weight of the panels, especially since my walls are textured (not completely flat), and the backs of the panels are wood (also having some texture and not 100% flat). I really didn’t want to risk panels potentially falling off the walls if the adhesive doesn’t hold.
The Command Strip solution worked perfectly for straightening out the crooked panels, so I’m happy with that fix. With a few 412 panels, I got lucky in that the panels were very straight with the default mounting, so I only used the Command Strips to straighten out 5 of the 8 panels of that type.
With the larger 422 panels, the brackets are far enough offset from each other (16″ apart as I installed them), so that made it much easier to get those hanging straight (with 0.25″ or less horizontal difference from top to bottom). I didn’t need to use any Command Strips to straighten those panels.
Teamwork
This was a great project to do with Rachelle because our strengths complemented each other nicely. I’m good at driving projects forward with action and decisiveness, but sometimes to keep advancing, I will gloss over aesthetic concerns and favor functional solutions. Rachelle is way more detail-oriented, and she has proper color vision whereas I’m color blind. She’s much better at picking color schemes and considering aesthetics. She largely picked the colors and fabrics whereas I focused on the acoustical considerations.
We spent hours going over the color and fabric options for the panels before we ordered them, taping fabric swatches to the walls to try to visualize what the results would look like. The panels are made to order, and it costs a lot to ship them, so we wanted to do our best to get the choices right the first time. Before we placed the order, we mapped out where we’d placed every single panel in each room.
I did reject some color options that didn’t look good to me. For instance, the spa and gray colors look identical to me. Those are the 3rd and 5th panels in the first pic above, respectively. I didn’t want those colors next to each other because it seemed like two of the same in a row. It was a bit tricky to identify options that looked good to both of us color-wise, but we managed.
I also wanted to get a variety of colors, so we could potentially change them up by swapping panels from different locations. That also gives us more flexibility in case one color doesn’t look so good on camera. So we have some backup possibilities, just in case we need them.
Fortunately I think we succeeded. I don’t have any regrets about the panel choices thus far. It will take time to give them a thorough test, but so far they do seem to work well acoustically.
This is my first experience with acoustic panels. As with many upgrades of this nature, you quickly learn that you could have gone further than you did because more is always possible.
For this project I wanted to go far enough to create a nice improvement that I’ll appreciate, but not so far as to feel like I’m over-reaching, over-spending, taking too long, or getting bogged down in micro-decisions. I decided going into this project that I should also stick with the basics, at least until I have a better grasp of how these panels work acoustically. I decided to avoid the really artistic design possibilities for now, even though I’m aware that way more is possible in that direction. Likewise I felt it was a wise decision to begin with simple sound blankets until I felt the timing was right to upgrade to acoustic panels.
I like that this project felt edgy and took me a bit out of my comfort zone, especially in terms of dealing with colors. I also like how it mixed audio and visual decisions with hand-ons working with tools. It took some patience to drive it to completion, so it was a good project to approach with a very methodical attitude. I found it helpful to acknowledge and celebrate each little act of progress along the way, including picking the colors, placing the order, unboxing everything, and installing each individual panel in its proper position. It feels good to have it all done. 
Receive Steve’s new articles by email.